I have one tomato plant that is producing split tomatoes. The tomatoes taste fantastic, but they are not pretty. The other three tomato plants are producing beautiful tomatoes.
I googled "Why do tomatoes split?" and found a web site titled Gardening Know How. The site explained the problem exactly: "Sometimes, if you have a lot of rain after a spell of really dry weather, you will find splitting tomatoes on your tomato plants" (see http://www.gardeningknowhow.com/vegetable/tomato-cracking.htm).
We had a very long stretch of no rain and now it's been raining for the last two days. I think the Gardening Know How web site describes my problem exactly.
However, the other tomato plants are doing just fine. Hmm. Perhaps I've done a better job watering them?
Thursday, June 23, 2011
Thursday, June 16, 2011
Water at the Base of the Plant, even with the hose
Shannon, you can still use your hose and water at the base of the plant. That's what I do most of the time. I have watered from our rain barrels, but it take considerably more time than watering from the hose. It all depends on my motivation that day!
If you're doing square-foot gardening, water one square at a time. Drench the square and then move on to the next.
Water in the morning. If you forget, then water before dinner. If you water mid-day, you'll lose most of the water to evaporation during the afternoon heat.
You do not want to water regularly after dinner because you could end up with mold. I don't know how often this happens in Georgia, but it's a possibility.
Friday, June 3, 2011
A Lesson in Watering
The boys and I just came inside after watering the garden. It's HOT outside! It's only 10:00 in the morning, and it's already 95 degrees outside!
Last summer and this summer are unusually hot, so the locals tell me. The winters have also been colder than usual the last couple years. As Minnesotans transplanted to Georgia, we are often blamed for the cold winters, but we have yet to be blamed for the hot, hOT, HOT summers!
Anyway, back to the garden. Thermoman and I watered the garden and noticed how things were growing. Thermoman was very excited about all the foods that we get to make. "Maybe we can have a garden dinner some night!" I LOVE his enthusiasm for veggies.
We noticed how tall all the plants are getting. We found peppers, and we noticed that some of the tomatoes are turning red!
I watered the back garden and the peppers, and Thermoman watered the front garden. While I was watering the peppers, I asked Thermoman to notice where I was putting the water. He said, "at the bottom. How come?"
I answered with a question, "What part of the plant takes in the water?"
"The roots."
"That's right. When we water at the base of the plant, we get the water to the roots faster. Also, several plants don't like to get their leaves wet all the time, like tomatoes."
So, remember to water at the base of the plant and leave the leaves alone. You provide the daily (or every other day) water to the roots. Let God provide the occasional water to the leaves!
Sunday, May 29, 2011
Crazy Potatoes; Lazy Cabbage... we planted something there, I swear!
Our homeschool group has two community gardens. Both gardens have a gardening journal. The journal provides a place to record what the weather has been like, what the plants look like, what the gardener did that day, what they enjoyed and learned, and the journal includes a Bible verse or prayer to remind us that God provides good land and wonderful growth.O Lord, grant that in some way it may rain everyday, say from about midnight until three o'clock in the morning, but you see, it must be gentle and warm so that it can soak in, grant that at the same time it would not rain on campion, alyssum, helianthemum, lavender and the others, which in your infinite wisdom know are drought-loving plants--I will write their names on a bit of paper if you like--and grant that the sun may shine the whole day long, but not everywhere (not, for instance, on spirea, gentian, plantain lily, or rhododendron) and not too much: that there may be plenty of dew and little wind, enough worms, no plant lice or snails, no mildew, and that once a week thin liquid manure and guano may fall from heaven. Amen.
But I am quite certain that no one is actually reading the garden journals. How do I know? Because no one--NOT ONE PERSON--has commented on the prayer above!
I have to admit that I'm so thankful to Mrs. Shannon (that's pronounced MizShannon down here in The South) for submitting this prayer for the garden journal. The prayer reminds me of how I want things to be easy. I did plenty of hard work to get the boxes set up, to get the soil mixed, to plant the plants and seeds. Can't I stop there?
NO!
Gardening is work. I must water my plants, prune them when they need pruning, provide support when they want to grow up and up and up, and protect them from pests. By the sweat of our brows, we will eat our food (see Gen 3:19), but oh so good that food will be!
(There are many more lessons to learn from that prayer, and
we have all summer to ponder them...)
we have all summer to ponder them...)
My poor plants. I have not been tending to them this past month. I have not been watering them regularly. I have not pruned them since that first time I blogged about pruning. I have not provided support for them (but Ms. Tina built them support this past week!). And I've provided just a little protection from pests, but the peppers feel neglected... Poor things.
Do you think the plants will forgive me?
Well, some of them have! But some of them have not shown that they were planted at all! Some squares in my square foot garden are very green with lots of growth. Other squares are very dark with lots of soil.
growing. GroWinG... GROWING!
What will we eat from the garden? Well, let's first take a look at which square are very green with lots of growth!
Potatoes
The potatoes are growing like crazy! They have taken over the root vegetable garden. The onions that I planted between the squares of potatoes did not come up at all. The potatoes are hogging all the sunlight! I had no idea that potatoes grew UP so high!
 |
| All that tall growth is potatoes! |
Lesson learned: Do not try to grow anything in between squares of potatoes because they will be fighting for sunlight.
Tomatoes
The tomatoes are also growing like crazy! The tomato plant in the middle has grown so tall that it has bent over with the weight. So, Ms. Tina built a trellis to support it and the other tomato plants, the cucumber plant, the pumpkin, the melons, the zucchini, the beans, and the cantaloupe.
 |
| This photo probably does not make the tomatoes look impressive. The one in the middle is the one that has grown so tall, but we bent it over to the trellis so that itwould grow up rather than on the ground. |
I see plenty of dark soil here, so I'm thinking that I can buy some basil plants to put among the tomatoes. Mmm... What could I make with tomatoes and basil?
Corn
The corn is growing, too. I think it's over 2 feet tall.
 |
| Corn and Peas |
Peas
The peas are growing among the corn. The other day, Ms. Tina and I wound the pea plants around the corn. The idea is to get the corn to act as a natural trellis for the peas. We'll have to see if it works!
Beans
The beans are growing well. They are just starting to get tall enough to need some support, so Ms. Tina and I gave them some string onto which to climb.

Cantaloupe, Pumpkin, Cucumber, and Zucchini
All growing well.

 |
| The cucumber was crowded by the tomato, so I moved the tomato over and up the trellis. The cucumber should get more sunlight now. |
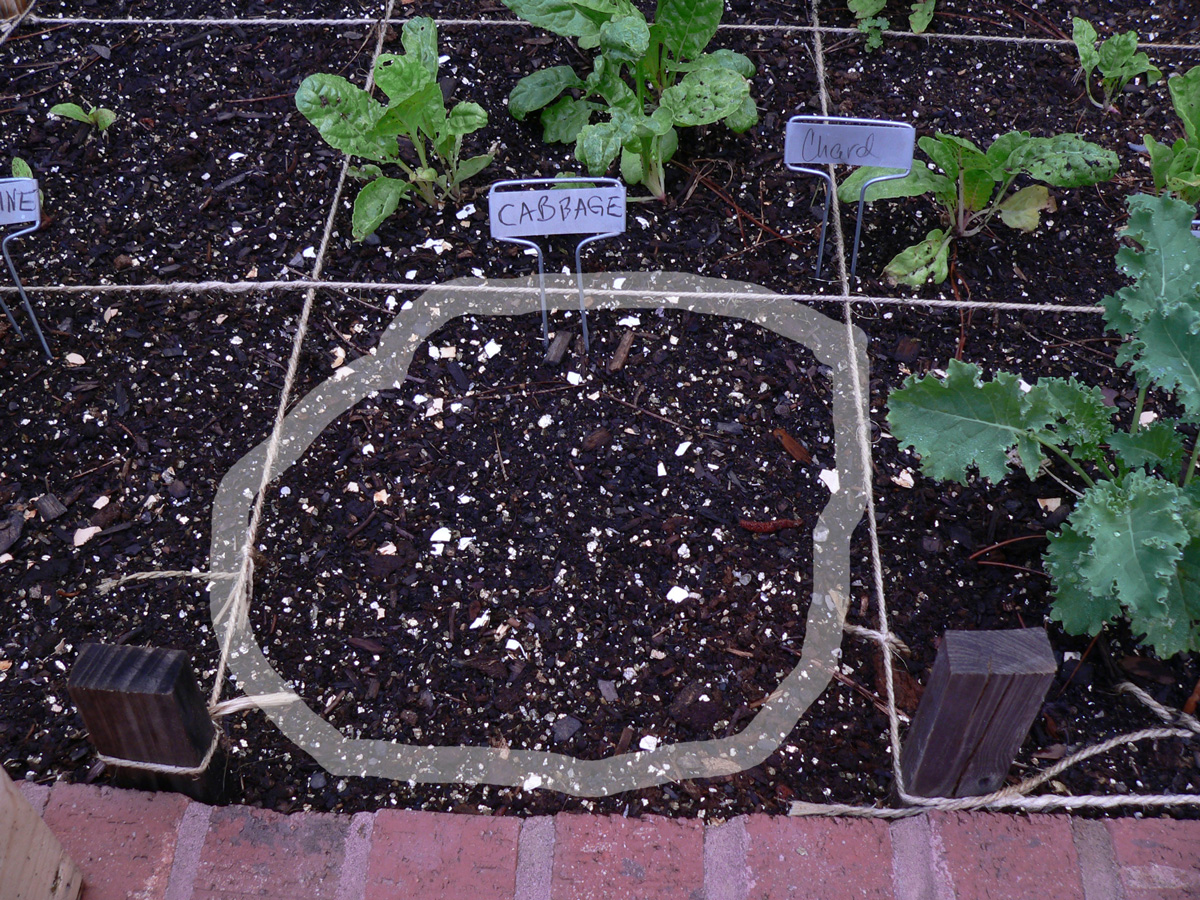
Lettuces, Chard, and Kale
Growing well, but I could sow more seeds.


 |
| The chard does have little holes in the leaves, so something seems to be eating it. |

Peppers
The peppers are over a foot tall, and there have been peppers on the pepper plants for over a month. However, the plant closest to the garage has struggled compared to the others.
 |
| The further the peppers are away from the garage, the taller they are. That means the plants on the right are getting more evening (west) sun than the plants on the left. |
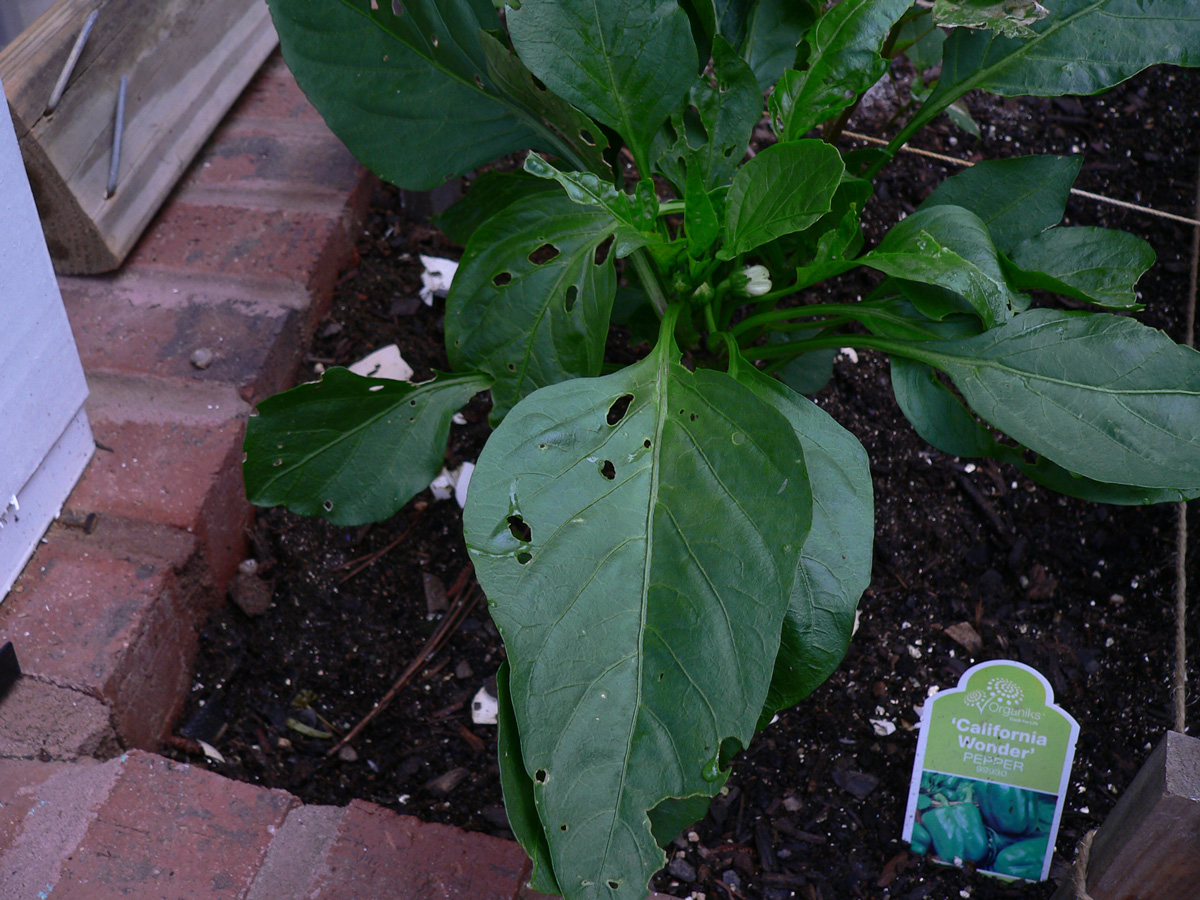 |
| The struggling pepper plant |
This plant has not grown as tall, it was losing its leaves when it was first planted, and now it seems to have something eating the leaves.
Broccoli
We have many broccoli plants! Even the one in Thermoman's pail is doing well--and there are no holes in the bottom to let it drain! I am amazed at how well it's doing.
 |
| Thermoman's broccoli |
However, we also have many squares of black soil with no broccoli plants. So, some seeds sprouted and some did not.


Two out of the three eggplant are growing!

Black Soil--and No Plants!
What won't we be eating? Let's find out where there's plenty of black soil and no plants.
Carrots
I can't tell you how sad I am about having only two carrot plants. I LOVE carrots, especially organic carrots because they taste so much better.
When I lived in Minnesota, I taste tested conventional carrots, organic carrots, and Minnesota Grown carrots. The organic and Minnesota Grown carrots were so much better than the conventional carrots, but I could never decide between the other two.
I am very curious as to whether my home-grown carrots will taste as good as organic from the grocery store. But with only two available for my test--and probably small ones at that--I probably will not find out this year.
Other than the fact that some of the carrots are competing with the potatoes for sun, I don't know why they didn't sprout. I guess I have some research to do.

Onions
There are just a few onions growing. Considering that we planted 12 in each of three squares, that's not saying much. Some of the onions are competing with the potatoes but not all of them. Why they didn't sprout is as curious as why the carrots didn't sprout.

Red Cabbage
I am very sad that the cabbage did not sprout! We only want the cabbage for science experiments, but how fun it would have been to go get the red cabbage from our very own back yard rather than making a run to the grocery store.
What's Cooking?
Right now, we could make Fried Green Tomatoes. (We are in Georgia, afterall... Actually, we're in the town where the movie "Fried Green Tomatoes" was filmed!) But I am looking forward to making our own spaghetti sauce or, better yet, our own salsa!
I look forward to taste-testing the corn to see if it's as good as Minnesota Grown (sorry, but the Florida corn that I've bought at the grocery store pales in comparison to Minnesota corn).
And I can't wait to go to my garden for lettuce and chard for my lunchtime salads!
Friday, May 27, 2011
Soaking Seeds for Faster Germination?
Mel says that I can give my seeds a jump-start by presoaking them. I mentioned this idea at the end of my post "Do Overs (or More on Watering)." The idea is that if seeds have water before they have to suck it out of the soil, then they will sprout faster.
I have to admit that I was a little chicken to try soaking the seeds.
Get it through your hard head--I mean hard shell...
I decided to get brave and give soaking a try, so I found some Web sites that told me more about soaking seeds than the one paragraph that Mel writes in his book and then tried it myself.
Here are the Web sites that I read:
- Pre-Soaking Your Seeds by Elizabeth and Crow Miller
- How to Soak Seeds Prior to Planting by GardenGuides.com
The boys and I soaked some seeds and observed how they changed... They really didn't change as much as we expected.
We soaked three types of large seeds and took pictures each hour--they didn't change at all. Well, one of the seeds did turn brown. I would guess that it was rotting? I really don't know.

We soaked 9 types of small seeds, and they didn't change at all, either, but I really didn't expect them to. I'm not sure that I could tell that they changed because they were so small to even look at. (Okay, so I don't have the greatest eyesight, but I challenge you to observe changes in tiny oregano seeds!)

I guess I thought the large seeds would fall apart. Mel did say that some seeds can be soaked overnight and some fall apart after only an hour. Well, I guess the ones that I chose were the hardy ones.
After soaking the seeds for an afternoon and seeing nothing change, we decided to leave them soaking overnight. We still didn't see any changes.
So, with that homeschool assignment done, I moved on to soaking seeds and then planting them. I still had some 180 Plant Dip, so I soaked some seeds in the Plant Dip and some in water. I did this almost a month ago at the end of April--remember my posting about how stinky the Plant Dip gets when you leave it in the sun for several weeks!?! [See "180 Plant Dip (Another Do-Over!)."] I thought it might be interesting to see if soaking the seeds in the Plant Dip worked better, worse, or the same as soaking them in water.
In the following picture, you see how I labeled the jars so that I wouldn't forget which seeds were which. Obviously, these seeds were soaked in water, not the Plant Dip. The Plant Dip had a brownish color to it.

Below are pictures of the pots in which I planted the cilantro and oregano seeds:


Well, I don't know that I have an answer to my "scientific" questions. Sorry! My presoaking didn't produce any results. The seeds didn't produce at all. The pots look the same today as the pictures above.
And I'm quite certain that it's all my fault. I got lax in my watering routine. I think the seeds did not produce because I did not water them every day or even every other day.
Mel does point out in his book that when seeds don't produce, it's usually because the new gardener gave up when they didn't see immediate results and stopped watering. At this point in his book, he's teaching us that seeds sprout down and make roots before they sprout up to make a stem. Recall the picture of the morning glory seeds that my Spiderman planted:

Well, I didn't give up because of lack of results. I just got lazy--or busy with other things. Yeah, that's it! (No, not really. If something is important to you, you'll make the time. I didn't make the time to water my garden regularly. My attention turned to things other than my garden.)
And the weather has been warmer than usual (at least that's what the locals tell me). For the most part, this past month has felt like a Minnesota July. My mom is still visiting from Minnesota, and that's how she describes the weather. We've had upper 80s and low 90s for most of the month. From what I understand from those who have lived here in Georgia far longer than me, this is about 10 degrees warmer than usual.
I guess I can only say that presoaking is probably a good idea--I mean, Mel says it's a good thing to do, and many other experienced gardeners pre-soak their seeds. I'll just have to try it again. Next time, I will only soak the large seeds because the small seeds are too difficult to pinch and plant.(With a warmer-than-normal "spring," I can only imagine how awfully hot it is going to be in July, August, and September when the Georgia humidity rears its ugly head! Yikes!)
If you have any success with or tips for soaking seeds before planting, please post a comment!
Saturday, April 30, 2011
180 Plant Dip (Another Do-Over!)
Word to the wise: Never, EVER leave the 180 Plant Dip out in the sun. Ooh, that's ripe!
I had to tie a bandana over my nose and exhale while leaning over the pail. I decided that I didn't want any of the dip left after today, so all the plants (except the peppers) got watered with the plant dip. Now my back yard smells and the flies are busy hanging around the plants.
But I'm sure the smell will be gone by tomorrow... or Monday.
Next time I buy the 180 Plant Dip, I think I'll use it all up that same day!
Friday, April 29, 2011
Do Overs (or More on Watering)
Wetting the Soil
I'm wondering what I did wrong or at least what I could have done better.
One thing I keep thinking about is water. Did I get the soil wet enough before I planted?
When I first mixed the soil (that is, made Mel's Mix), I watered just enough to keep the peat moss and vermiculite from blowing away. I did not want to water too much because then the whole mix gets so heavy that it's hard to move into the boxes.
However, when I had the soil ingredients mixed and in the boxes, I should have completely drenched the soil. Mel says that I can't over-water because the soil drains so well. Remember the analogy of the sponge?
I noticed that the leaves on the peppers were turning yellow, so I pruned them off the plants. No leaves have been lost in the last week, so I'm hoping that they are done being mad at me.
I do have a few squares of soil that do not yet have seeds in them. I'll be planting lettuces in them over the next several weeks (so that I have lettuce ready to harvest over weeks rather than all at once). When I water, I water these empty squares as well so that the soil is ready for the seeds when I am ready to plant.
Soaking Roots
Mel says to soak the roots of transplants before putting them into the soil. Seems that I should have read that before I taught my students how to plant! I had two students who planted plants rather than seeds. One of them planted cherry tomatoes and the other planted peppers.
I should have taught them to soak the root ball in water before putting the plant into the soil.
As for the community garden, I did soak the roots! I soaked the roots in the 180 Plant Dip, remember? (See the post titled "A Vitamin Boost for the Plants.")
The tomatoes seem very happy, so I'm glad I soaked their roots in the 180 Plant Dip.
The peppers had been losing leaves. I'm not sure if they were upset with the plant dip, with being planted earlier than Mel says they should be, or with not having wet enough soil. I guess I'll just have to re-read this blog entry before planting next spring and then watch to see if I have different results.
Soaking Seeds
Mel says to soak the seeds before planting them. I didn't do that. :-(
I did not understand from Mel's book how long I should soak the seeds or exactly how to do it, so I chickened out and didn't soak them at all.
That means that I did not teach my students how to soak seeds, either. Ugh!
Many of the seeds were so small that I could hardly pinch just a couple to get them into the soil, so I can only imagine that I would have lost the seeds in the water if I had soaked them first.
But perhaps I could have put them on paper towel and then got the towel wet?
Mel says that soaking the seeds will result in faster sprouting. He also says to be careful because some seeds will fall apart. Perhaps the boys and I could experiment with the extra seeds... I'll let you know what we learn from our experiments.
I'm wondering what I did wrong or at least what I could have done better.
One thing I keep thinking about is water. Did I get the soil wet enough before I planted?
When I first mixed the soil (that is, made Mel's Mix), I watered just enough to keep the peat moss and vermiculite from blowing away. I did not want to water too much because then the whole mix gets so heavy that it's hard to move into the boxes.
However, when I had the soil ingredients mixed and in the boxes, I should have completely drenched the soil. Mel says that I can't over-water because the soil drains so well. Remember the analogy of the sponge?
When you take a dry sponge and slowly add water to it, it just keeps soaking up water until it's finally saturated. At that point, any extra water just drains out the bottom. Well, it turns out that two of our ingredients--peat moss and vermiculite--do exactly the same thing. It takes a while to wet them and keep them moist so you have to keep adding water, but finally, when they become saturated, any excess water just drains right out the bottom.I wonder if the peppers were mad because the soil was not wet enough?
I noticed that the leaves on the peppers were turning yellow, so I pruned them off the plants. No leaves have been lost in the last week, so I'm hoping that they are done being mad at me.
I do have a few squares of soil that do not yet have seeds in them. I'll be planting lettuces in them over the next several weeks (so that I have lettuce ready to harvest over weeks rather than all at once). When I water, I water these empty squares as well so that the soil is ready for the seeds when I am ready to plant.
Soaking Roots
Mel says to soak the roots of transplants before putting them into the soil. Seems that I should have read that before I taught my students how to plant! I had two students who planted plants rather than seeds. One of them planted cherry tomatoes and the other planted peppers.
I should have taught them to soak the root ball in water before putting the plant into the soil.
As for the community garden, I did soak the roots! I soaked the roots in the 180 Plant Dip, remember? (See the post titled "A Vitamin Boost for the Plants.")
The tomatoes seem very happy, so I'm glad I soaked their roots in the 180 Plant Dip.
The peppers had been losing leaves. I'm not sure if they were upset with the plant dip, with being planted earlier than Mel says they should be, or with not having wet enough soil. I guess I'll just have to re-read this blog entry before planting next spring and then watch to see if I have different results.
Soaking Seeds
Mel says to soak the seeds before planting them. I didn't do that. :-(
I did not understand from Mel's book how long I should soak the seeds or exactly how to do it, so I chickened out and didn't soak them at all.
That means that I did not teach my students how to soak seeds, either. Ugh!
Many of the seeds were so small that I could hardly pinch just a couple to get them into the soil, so I can only imagine that I would have lost the seeds in the water if I had soaked them first.
But perhaps I could have put them on paper towel and then got the towel wet?
Mel says that soaking the seeds will result in faster sprouting. He also says to be careful because some seeds will fall apart. Perhaps the boys and I could experiment with the extra seeds... I'll let you know what we learn from our experiments.
Thursday, April 28, 2011
Watching 'Em Grow (or Getting Excited about Broccoli)
Building a See-Through Planter
 Thermoman and his little brother, Spiderman, did some building. Using a kit from Lowe's, they made a see-through planter. It's cool! The front has plastic so that when you plant the seed up against the plastic, you can watch the roots grow.
(I couldn't find the specific kit on the Lowe's web site, but here's a link to the Build and Grow kits that they do have online. If you're local, look for the planter at Lowe's in Newnan.)

Spiderman chose to plant purple flowers. He chose purple because that's my favorite color. Isn't that sweet?
Of all the flower seeds that I have, he chose Morning Glories. Since these are vines, we will have to transplant them at some point. But in the mean time, we look forward to watching the roots grow as well as the flowers.

Thermoman chose to plant broccoli. He LOVES broccoli. Really, he does! (He is my child, after all! I have also loved broccoli since I was a child. It's a family thing! My siblings and I have loved broccoli and hollandaise sauce since we were kids!)
Thermoman closely watches the broccoli that's planted in the garden. He has a broccoli plant growing in a pail (we had planted the seeds before we decided to have a garden).

And now broccoli in the see-through planter. If he has an opportunity to plant, he plants broccoli!
"Gardening is science?"
When we finished gardening, I told Thermoman that we were done with science for the day. "Gardening is science?" he asked. I chuckled. I guess that in his mind science means chemistry or electricity.
We've been doing kitchen chemistry with a Fizz Wizard and Jammin' Jelly Reaction Kit (only $10). So far, we've been testing pH levels. We've gone beyond what the kit suggests that we test to testing anything that interests us, from Sprite to cream of tartar.
We even made our own "magic color" by boiling red cabbage. The purple cabbage juice can be used to test whether something is an acid or a base. When you add baking soda to cabbage juice, you'll get pink or red, which indicates that the baking soda is a base. When you add vinegar to cabbage juice, you'll get blue or green, which indicates that the vinegar is an acid.
So what about testing soil for pH levels?
Taking Chemistry Out of the Kitchen and Into the Garden (Soil pH)
We decided to learn more about testing pH levels by buying Soil Test kits, also from Lowe's. We bought three kits so that we could test the pH levels of three soils. I honestly don't know about the reliability of the test kits, and we did find them hard to read.
From what Thermoman and I could tell, our red Georgia clay is the most acidic. Not surprising. The organic soil that we bought was on the acidic side--between pH 6 and 7. The Mel's Mix soil that I made was closer to neutral, but still seemed to be a bit acidic. I need to find out why!
The soil kit listed the preferred pH levels of different plants. What we really wanted to know was the preferred pH level of blueberries because we have blueberries planted in Georgia clay. Thankfully, blueberries like acidic soil--which explains why they do so well here!
(I couldn't find the specific kit on the Lowe's web site, but here's a link to the Build and Grow kits that they do have online. If you're local, look for the planter at Lowe's in Newnan.)

Spiderman chose to plant purple flowers. He chose purple because that's my favorite color. Isn't that sweet?
Of all the flower seeds that I have, he chose Morning Glories. Since these are vines, we will have to transplant them at some point. But in the mean time, we look forward to watching the roots grow as well as the flowers.
Thermoman chose to plant broccoli. He LOVES broccoli. Really, he does! (He is my child, after all! I have also loved broccoli since I was a child. It's a family thing! My siblings and I have loved broccoli and hollandaise sauce since we were kids!)
Thermoman closely watches the broccoli that's planted in the garden. He has a broccoli plant growing in a pail (we had planted the seeds before we decided to have a garden).

And now broccoli in the see-through planter. If he has an opportunity to plant, he plants broccoli!
"Gardening is science?"
When we finished gardening, I told Thermoman that we were done with science for the day. "Gardening is science?" he asked. I chuckled. I guess that in his mind science means chemistry or electricity.
We've been doing kitchen chemistry with a Fizz Wizard and Jammin' Jelly Reaction Kit (only $10). So far, we've been testing pH levels. We've gone beyond what the kit suggests that we test to testing anything that interests us, from Sprite to cream of tartar.
We even made our own "magic color" by boiling red cabbage. The purple cabbage juice can be used to test whether something is an acid or a base. When you add baking soda to cabbage juice, you'll get pink or red, which indicates that the baking soda is a base. When you add vinegar to cabbage juice, you'll get blue or green, which indicates that the vinegar is an acid.
So what about testing soil for pH levels?
Taking Chemistry Out of the Kitchen and Into the Garden (Soil pH)
We decided to learn more about testing pH levels by buying Soil Test kits, also from Lowe's. We bought three kits so that we could test the pH levels of three soils. I honestly don't know about the reliability of the test kits, and we did find them hard to read.
From what Thermoman and I could tell, our red Georgia clay is the most acidic. Not surprising. The organic soil that we bought was on the acidic side--between pH 6 and 7. The Mel's Mix soil that I made was closer to neutral, but still seemed to be a bit acidic. I need to find out why!
The soil kit listed the preferred pH levels of different plants. What we really wanted to know was the preferred pH level of blueberries because we have blueberries planted in Georgia clay. Thankfully, blueberries like acidic soil--which explains why they do so well here!
Wednesday, April 27, 2011
Watering Mel's Way
Mel wants us to water our plants by hand with sun-warmed water. I know that tomatoes don't much like getting their leaves wet all the time, so I've been diligent about watering them at the base of the plant. (I think that tomatoes are more prone to diseases if their leaves are wet all the time.) I've done the same with the peppers.
The remaining plants were put in the garden as seeds. I don't like the idea of pouring water on them. I want to sprinkle water on them--more like rain. To accomplish this, I have used the watering can that sprinkles, and I have used the hose.
I know! I know! Mel doesn't like the hose. However, I do not yet have enough containers to hold sun-warmed water to match the amount of watering I want to do. Be patient. I'll get there!
In the mean time, I'm filling each of my water cans (even the little kiddie one for the beach) with water each day and letting them sit out overnight. My intention is to let the chlorine evaporate out of the water and to let the water warm up. Mel taught me that plants don't like to be shocked with cold water directly from the spigot.
I'm also teaching my 7 year old how to water the garden. That boy loves water! So, I might as well teach him to use his love of water to make the plants grow. And since he wants to eat all the broccoli (no, really! he does!), he is willing to water all the plants.
I'll call this boy Thermoman. That is his nickname around the house because he rarely gets cold.
Thermoman knows not to water the tomatoes with the hose. He also knows to set the sprayer on sprinkle, not a steady stream that can dig holes in the soil. He has to hold the hose up high so that it is like rain coming down from above, not like rain blowing in from the side.
And he does pretty well! I have to check up on him occasionally, but overall Thermoman is doing a great job!
Tuesday, April 26, 2011
Pruning for Stronger Stems and More Fruit
The tomato plants have been in the garden for just over a week. This is what the tallest one looked like as of Monday morning. (Today, this plant has tomatoes on it!)


I watered the plants after I pruned them, then that night it rained. Tonight (just one day later), there are several tomatoes on the plant! Woo hoo!
I have read on Web sites that pruning tomatoes results in larger fruit earlier in the season because the plant puts its energy into fruit production. So far, I'd have to say that my plants are proving that point!
To prune the smaller "suckers" (that really is what the branches are called), I just pinched them off the plant. To prune the larger suckers, I used scissors. Evidently, I should have sterilized the scissors between plants so as not to transfer diseases from one plant to another. I guess I'll have to find out how to sterilize scissors!

When I bought the plants from Country Gardens, one of the employees taught me about pruning tomatoes. He suggested pruning so that I would have 2 main shoots. He said that having two main shoots will encourage the plant to grow up rather than out. The plant will concentrate on making those two shoots strong rather than spreading the energy among many shoots. That made sense to me, so I pruned!
Here is that same tomato plant after I pruned it Monday morning.

I watered the plants after I pruned them, then that night it rained. Tonight (just one day later), there are several tomatoes on the plant! Woo hoo!
I have read on Web sites that pruning tomatoes results in larger fruit earlier in the season because the plant puts its energy into fruit production. So far, I'd have to say that my plants are proving that point!
To prune the smaller "suckers" (that really is what the branches are called), I just pinched them off the plant. To prune the larger suckers, I used scissors. Evidently, I should have sterilized the scissors between plants so as not to transfer diseases from one plant to another. I guess I'll have to find out how to sterilize scissors!
Monday, April 18, 2011
A Vitamin Boost for the Plants
I want to plant!
I'm actually late in getting plants into the ground. Some plants could've been in the ground weeks ago and some had to wait for the last frost date of April 14th. My work on Saturday was to get something planted!
It was too windy to mix more soil, so I rearranged the soil so that I had sections of the boxes full of soil and ready to plant.
Mom helped me get the garden marked so that I could see the square feet. We used stakes and twine.


And the peppers are in the front garden on the west side:


I'm actually late in getting plants into the ground. Some plants could've been in the ground weeks ago and some had to wait for the last frost date of April 14th. My work on Saturday was to get something planted!
It was too windy to mix more soil, so I rearranged the soil so that I had sections of the boxes full of soil and ready to plant.
Mom helped me get the garden marked so that I could see the square feet. We used stakes and twine.

If I had it to do over again, I would've put in the stakes before I put down the weed barrier. The weed barrier did not let the stakes through!
After shopping at Country Gardens for plants and seeds, Mom and I went home and planted tomatoes, peppers, chard, lettuces, cabbage, and kale. I also planted a blueberry bush in another place in my yard. (Don't worry, another bush will be planted soon so that the blueberries can cross pollinate.)
I followed Mel's guides on how many plants to put in each square--well, mostly. I did put marigolds in some empty squares even though those squares will likely be filled by the vegetables in a month or so. We'll have to watch and see!
There's another thing that I did that's not in Mel's book. I dipped the plants in 180 Plant Dip before transplanting them into the garden.
What is 180 Plant Dip? It's a boost for the plants. It's like giving the plants vitamins and something to help them absorb those vitamins.
I thought about using the analogy of caffeine--having your morning coffee (or Coca Cola, as is the case for me) to get your day off right--but caffeine is temporary and doesn't provide your body with nutrition. No, 180 Plant Dip is more like taking really good vitamins.
You can read about the 180 Plant Dip on the 180 Degree Farm's blog. Scott of the 180 Degree Farm made a batch for me. (Well, I bought the dip. The farm is a non-profit organization, so I gladly over-paid him.) The Plant Dip contains:
- well water
- fish emulsion
Fish emulsion is a common fertilizer used in organic gardening. One thing I remember from learning about the first Thanksgiving is that the Native Americans taught the colonists to dig a deep hole to "plant" a fish, cover it with soil, and then plant corn seeds over the fish... Hmm... Seems they knew something that we have forgotten over the years! - Ocean Trace
Ocean Trace is an organic fertilizer from the sea, containing all 74 minerals contained in ocean water. When crops get a healthy dose of micro-nutrients, they are more nutritious, generally yield better, and are more resistant to pests. Learn more about Ocean Trace on the AG-USA web site. - Rhizofuel
Among Rhizofuel's benefits are Improved nutrient and water uptake and more efficient use of fertilizer and water--reduces need by 1/3. You can learn more about Rhizofuel on their web site.
I followed Scott's directions. Here's what I did.
- Wore plastic gloves because the fish emulsion is stinky! My husband gave me a good tip--cuff the gloves so that if I lift my arms, the liquid does not go up my arm and onto my clothes.
- Stirred the 180 Plant Dip because the ingredients will settle to the bottom.
- Tipped the plant over and tapped the bottom so that the pot would come off easily.

- Dipped the roots into the 180 Plant Dip for at least 10 seconds. I have to admit that I usually dipped for 15 seconds, especially for the peppers because their potting soil looked so dry.

- Let the root ball drain for a bit so that I could transfer it into the garden with very little Plant Dip getting on the path where it would be wasted.

- Planted in Mel's Mix. I started using a trowel to make a hole in the soil, but then I realized that Mel's Mix is so light and airy that I didn't need a trowel, so I just used my hands.

- I also "watered" the vegetables with the 180 Plant Dip.


And the peppers are in the front garden on the west side:

And I planted lettuces, cabbage, kale, and Swish chard (which is like spinach) from seed in the front garden on the east side. In two weeks, I'll plant more lettuces. And two weeks after that, even more lettuces and so on.

Next step? Mix more soil, finish marking square feet, and finish planting!
Sunday, April 17, 2011
Mixing Up Golden Soil (or Making Mel's Mix)
"Feed the soil and let the soil feed the plants."
Anything I read about organic gardening talks first about the soil. The better the soil, the better the plants.
My thought is that the better the soil, the better the nutrition. That's what I want. I want nutritious and good-tasting vegetables.
Mel says that he has put together "the very best ingredients for that perfect growing soil." Don't bother with the soil that's in your garden. Don't bother with soil tests. Don't bother with digging. Once you make Mel's Mix, you never have to replace your soil. These are his claims. Since he's been gardening far longer than I have, I'm all for giving his way a try.
Mel's Mix is an investment. But I can already see that it's the most important part of the garden, so I've decided to make the investment. And I'm taking Mel at his word that I won't have to replace this soil in the years to come.
I made a big batch of Mel's Mix this week and put it in the front and back gardens. Here's what I did.
Mel's Mix contains:
- 1/3 vermiculite
- 1/3 peat moss
- 1/3 compost (which itself should include 5 different composts, unless you're using your own)
At first this seemed like an impossible task, but then I thought about sponges. When you take a dry sponge and slowly add water to it, it just keeps soaking up water until it's finally saturated. At that point, any extra water just drains out the bottom. Well, it turns out that two of our ingredients--peat moss and vermiculite--do exactly the same thing. It takes a while to wet them and keep them moist so you have to keep adding water, but finally, when they become saturated, any excess water just drains right out the bottom.
From Country Gardens, I also bought 4 different composts, including composted cow manure and mushroom compost. I do not have my own compost because we just started composting, so I won't have any quantity for a while.
I bought peat moss from one of the chains because it was considerably cheaper than what Country Gardens had to sell. I hope I don't regret spending less money on that ingredient. By the way, the chains only had small bags of vermiculite.
In the front and back garden boxes, I put down a weed blocker. I happened to purchase mine from a chain, but I've been told that newspaper works, too.
I mixed up the ingredients a little differently than Mel's instructions (see the bottom of page 101). Because my garden is in the retaining wall and elevated, I did the mixing right in my garden space. I chose a day that was NOT windy, and I put the vermiculite right in the box and watered it. I then put the peat moss directly into the box and watered it. The vermiculite and the peat moss are both very light. They need water just so that they don't blow away!
Then I mixed the compost the way that Mel says to do so (see page 102). I added the compost to the garden box and then mixed the three ingredients. Using the garden rake, turned upside down, worked well for mixing the soil. I also got down and mixed by hand. I found that my mom was much better at mixing with the rake than I was!
I was so thrilled to have soil in my boxes! But later that night I realized that the boxes were not full enough. I need the soil to be all the way to the top of the front garden box and nearly to the top of the back garden box. They are not. So, I need to mix more soil.
Thankfully, I have plenty more vermiculite and peat moss. What I need is more compost.
Below are pictures of what the front and back gardens looked like once I put Mel's Mix in them.


The Parable of the Sower
Still other seed fell on good soil. It came up and yielded a crop, a hundred times more than was sown. (Luke 8:8)(Go to http://www.biblegateway.com/passage/?search=Luke%208:5-8,%2011-15&version=NIV for the complete parable.)
Thank You so much, Lord, for the good soil that will yield a crop a hundred times more than was sown in accordance with Your timing. In Jesus' Name, Amen!
Monday, April 11, 2011
Boxes and Soil
Well, we can now easily see where the veggies will grow, and we have a well-designated path. We also have a small amount of soil suitable for growing vegetables, and it's actually in the garden. It's a start.
Before the community gardeners came over Saturday, my husband and I got boxes set up in the main garden and the Georgia clay rearranged. Below are pictures of what the boxes looked like before the gardeners arrived.


Once the community gardeners and I made Mel's Mix (which is 1/3 compost, 1/3 vermiculite, and 1/3 peat moss) we filled a small portion of the front garden.

 This first batch of Mel's Mix was expensive because I only found small 8 oz bags of vermiculite at one store. But today I found a nursery that sells vermiculite in bags of 4 cubic feet, so I'm waiting for the next delivery (the store was out of it) so that I can buy some.
The other option is to have top soil delivered. However, we would still need to add compost because that's the source of nutrition for the plants and ultimately for those of us who eat them. We would also need to add either peat moss or vermiculite or something similar in order to be sure there's plenty of air in the soil as well as drainage.
I could setup an experiment whereby I plant the same things in Mel's Mix as I do in another type of soil. Maybe we'll have a section with purchased organic soil that has compost, vermiculite, perlite, and peat moss (among other things), but I really don't want to invest in top soil.
That's what it is--an investment! With Mel's Mix, I should be able to just add compost from my own composter from now on. At least that's what his book says.
With the increase in gas prices, we may not have the money next year to switch to Mel's Mix if the top soil doesn't work well. I really want to do it right this year.
Before the community gardeners came over Saturday, my husband and I got boxes set up in the main garden and the Georgia clay rearranged. Below are pictures of what the boxes looked like before the gardeners arrived.

The back garden is made of 2"x12"s, so we could fill it with 12" of soil. However, this would be costly, twice as costly than having the 6" of soil that Mel says we need.
Because we planted the root veggies in the strawberry planter, I don't need the back garden for root vegetables. So I filled the back garden half full of Georgia clay. Before putting in the garden soil this week, I'll put down a weed barrier.


The next picture shows how little space has gardening soil in it!

The other option is to have top soil delivered. However, we would still need to add compost because that's the source of nutrition for the plants and ultimately for those of us who eat them. We would also need to add either peat moss or vermiculite or something similar in order to be sure there's plenty of air in the soil as well as drainage.
I could setup an experiment whereby I plant the same things in Mel's Mix as I do in another type of soil. Maybe we'll have a section with purchased organic soil that has compost, vermiculite, perlite, and peat moss (among other things), but I really don't want to invest in top soil.
That's what it is--an investment! With Mel's Mix, I should be able to just add compost from my own composter from now on. At least that's what his book says.
With the increase in gas prices, we may not have the money next year to switch to Mel's Mix if the top soil doesn't work well. I really want to do it right this year.
Somehow I think I'll be making more Mel's Mix later this week...
Sunday, April 10, 2011
How Do You Pronounce "Root"?
I live in Georgia, but I'm from Minnesota. My friend Beth, from New York, laughs every time I say "root." She says, "that's the one word that New Yorkers say correctly!"
The 9-10 year old kids in our gardening class laugh, too. "How am I supposed to say it?" I asked. They said, "OO makes the 'ooh' sound." I interpreted this to mean that "root" rhymes with "boot." I always pronounced "root" like it rhymes with "foot." One of the girls gave me the assignment to learn how to pronounce "root" correctly before the next class!
Now with that lesson in pronounciation, let me tell you that the root vegetables are planted! Three of the kids from our homeschool co-op, one of the moms, and I planted onions, carrots, and potatoes. You can plant 16 onions in a square foot, 16 carrots in a square foot, and 4 potatoes in a square foot.
What was surprising for us novice gardeners is that you grow potatoes from potatoes! The eyes of the potato sprouts. Each sprout can be a plant. So, we cut the potatoes so that each section had a sprout on it. We planted the sections with the sprouts facing up about 2" below the soil.
We have 9 square feet in the strawberry planter, containing 3 square feet of onions, 3 square feet of carrots, and 3 square feet of potatoes. Can't wait to see how the garden grows!
Here's a picture of the strawberry planter as of yesterday:

My boy put in the sticks. One of the girls tied twine to the sticks to designate each foot in the length of the planter. The strawberries are trying to grow in the front, outside the square foot.
Saturday, April 9, 2011
Joining the Garden Challenge
I remember You Lord, my God, and praise You for the good land that You have given us, for it is You who gives us the ability to produce wealth. (from Deut 8:10, 18)
I am joining the Garden Challenge! Check out The Homeschool Village.
Friday, April 8, 2011
Better Measurements
That curve in my beautiful landscaping is driving me crazy!

The curve makes for nice landscaping but doesn't help with square foot gardening. This is one of the reasons that Mel teaches people to build squares! Sigh.
Remember how I said that I measured wrong? Well, the problem is that I measured along the retaining wall rather in the newly created garden space.
The space that I thought looked like this:
 Looks more like this:
 When we get this all setup (tomorrow!?!), the back garden will be 36 square feet and the front garden will be about 53 square feet for a total of 89 square feet.
In the back garden, I'd like to plant the climbing veggies: tomatoes, cucumbers, melons, etc. I'd like to put the remaining (non-root) veggies in the front garden. The root veggies will go in the planter with the strawberries, which looks like this:


The curve makes for nice landscaping but doesn't help with square foot gardening. This is one of the reasons that Mel teaches people to build squares! Sigh.
Remember how I said that I measured wrong? Well, the problem is that I measured along the retaining wall rather in the newly created garden space.
The space that I thought looked like this:


In the back garden, I'd like to plant the climbing veggies: tomatoes, cucumbers, melons, etc. I'd like to put the remaining (non-root) veggies in the front garden. The root veggies will go in the planter with the strawberries, which looks like this:


Subscribe to:
Posts (Atom)